Arancini are delightful, decadent, deep-fried masterpieces, full of leftover risotto. Other fillings can vary, but usually, you’ll find them stuffed with a piece of mozzarella, a bit of ragú, or, like the ones I had in Italy, just risotto, with pieces of pancetta floating throughout.
After having these abroad, I wondered why we bothered with mozzarella sticks or toasted ravioli. These are the ultimate authentic Italian appetizer (or main dish).
Now, all this to say that making risotto is not actually difficult. The only thing is that you are committing to standing over your stovetop for at least 30 minutes, minimum. Otherwise, the dish is simple.
Ingredients
- Arborio, Carnaroli, or Vialone Nano Rice (see “Rice Report”)
- Yellow or White Onion
- Garlic
- White Wine
- Chicken, Beef, or Vegetable Stock
- Olive Oil
- Parmesan Cheese
- Mozzarella Cheese (see “Filling Variations”)
- Flour
- Eggs
- Panko Breadcrumbs
- Salt
- Pepper
- OPTIONAL: Lemon Zest
- OPTIONAL: Lemon Juice
- OPTIONAL: Heavy Cream
- OPTIONAL: Dried Oregano
- OPTIONAL: Marinara Sauce
Supplies
- Wide stock pot or dutch oven, at least 6” deep
- Another stock pot or dutch oven
- Air Fryer (I used a CHEFMAN Air Fryer)
- 3 Small Bowls
- Spatulas
- Baking Sheets
- Parchment or Wax Paper
- Plastic Wrap
How to Make Air Fryer Arancini:
STEP ONE: Mise en Place
Mise en Place is French for “to put in place.” Many chefs swear that mise en place is crucial to a successful dish.
Now, I don’t think it’s necessary for every dish, but with something that moves as quickly as risotto, I would really recommend it.
All mise en place entails is that you prepare your ingredients before you even turn on the stove.
This means your onions and garlic need to be chopped and minced, your wine needs to be measured and sitting near the stove, ready for its turn to go in the pot.
Have your rice measured and, in this case, get your stock boiling on a back burner. This is an absolute necessity (See “Stock Talk”).
Get out your salt, pepper, and any measuring devices or utensils you may need. Since risotto requires a lot of attention, it’ll be much easier and less chaotic to have your ingredients and tools in place.
For this dish, you can wait to prepare the ingredients for breading and frying, as your arancini will have to hang out in the fridge for a little while first.

STEP TWO: Sweat the Onion & Garlic
Now that you have your mise en place, you can begin on the risotto.
In a dutch oven or stock pot, heat 2 tablespoons of olive oil over low-medium heat.
Once your oil is to temperature (you can check this by throwing in one piece of onion and see if it sizzles), add your onion and stir. You’ll want the onions to sweat and turn translucent. This will take about 5 minutes. If your onions begin browning, turn down the heat.
Once your onions are translucent, add the garlic and cook until fragrant, about 1 minute.
STEP THREE: Toast the Rice
Next, pour in the rice. Here, you will toast the rice in the olive oil with the onions and garlic. When the grains of rice are translucent around the edges and white in the middle and well coated in oil, you can deglaze the pan.

STEP FOUR: Deglaze the Pan
Carefully add the wine to the pot. The wine should bubble rapidly. Stir, scraping the bottom of the pan to make sure you get all the flavor you’ve built up so far.
STEP FIVE: Add the Stock
Now, here’s where it gets serious. You’ll be standing over your stovetop for a little while. In order to make a proper risotto, the rice needs to be constantly agitated so the starches come out of the rice and mix with the stock. This creates a creamy texture.
Add in 1 cup of hot stock. Stir constantly until all that stock is absorbed. The stock should bubble rapidly, similar to the wine.
Repeat twice more. (3 total cups of stock, 1 cup absorbed at a time) You should see the stock becoming more cloudy, meaning the starches are coming off of the rice properly.
Once three cups are absorbed, notice how cooked your rice is. The texture we’re looking for is one similar to oatmeal. If your rice is not looking like oatmeal, we need to keep going.
If you’re not sure, taste your rice and if it’s still hard, it needs more stock and cooking.
Continue adding 1 cup of stock at a time, tasting after each absorption. Mine usually took around 8-9 cups of stock.
You’ll know your risotto is done when it is creamy and has an oatmeal-like texture and the rice is tender.
Now is a good time to add salt, if needed.

STEP SIX: Off-Heat Additions
Remove risotto from heat. Taste. Season with pepper and salt, if necessary.
Add 2 oz of grated Parmesan cheese and stir.
If adding lemon zest, lemon juice, and/or heavy cream, now is the time to add it.
Feel free to add other seasonings, if you like.
STEP SEVEN: Prepare Risotto for Fridge
Once all additions are nice and combined, pour the risotto onto a parchment or wax paper-lined baking sheet, creating a smooth, even slab.
Wait for risotto to cool on the counter. Once it is no longer steaming, cover with plastic wrap and put in the fridge for 1 hour.

STEP EIGHT: Forming the Arancini
Slice mozzarella into cubes. You’ll only need enough for the amount of arancini you make, so about 10-12 cubes. Try to make them no more than ¾” thick.
Take risotto out of the fridge. Using a ¼ cup measuring cup, scoop portions of the risotto and place the portions onto a new baking sheet (or just recover the same one with new parchment or wax paper).
Once they are all portioned, work one portion at a time. Flatten the risotto between your palms, no thinner than ½” (think latkes). Place one cheese cube into the center of the risotto and carefully wrap the risotto around the cheese.
Ensure no cheese is visible. Roll the ball between your hands to smooth it out. Repeat with all portions.
Once all arancini balls are made, place the baking sheet full of them into the freezer for about 2 hours.
NOTE: You can put them in there for longer, but you may have to adjust your cook times.

STEP NINE: Breading the Arancini
First, we will set up our breading station. In three bowls, you’ll place the following:
Bowl 1 – 1 cup flour, opt: salt, opt: pepper
Bowl 2 – 2 eggs
Bowl 3 – 1 cup Panko, opt: dried oregano
Retrieve arancini from the freezer. Working individually, roll the arancini in flour, followed by egg, followed by Panko.
Repeat with each arancini. Place back on the baking sheet and return to the freezer for 10 minutes.

STEP TEN: Air Frying
While the arancini are chilling, preheat the air fryer for 5 minutes at 400 F.
Remove 3 arancini at a time, and place in the air fryer basket with plenty of space between them (at least 1”).
Cook at 400 F for 11 minutes (see chart for air fryer times) or until outside is crispy and beginning to brown and cheese is melted inside.
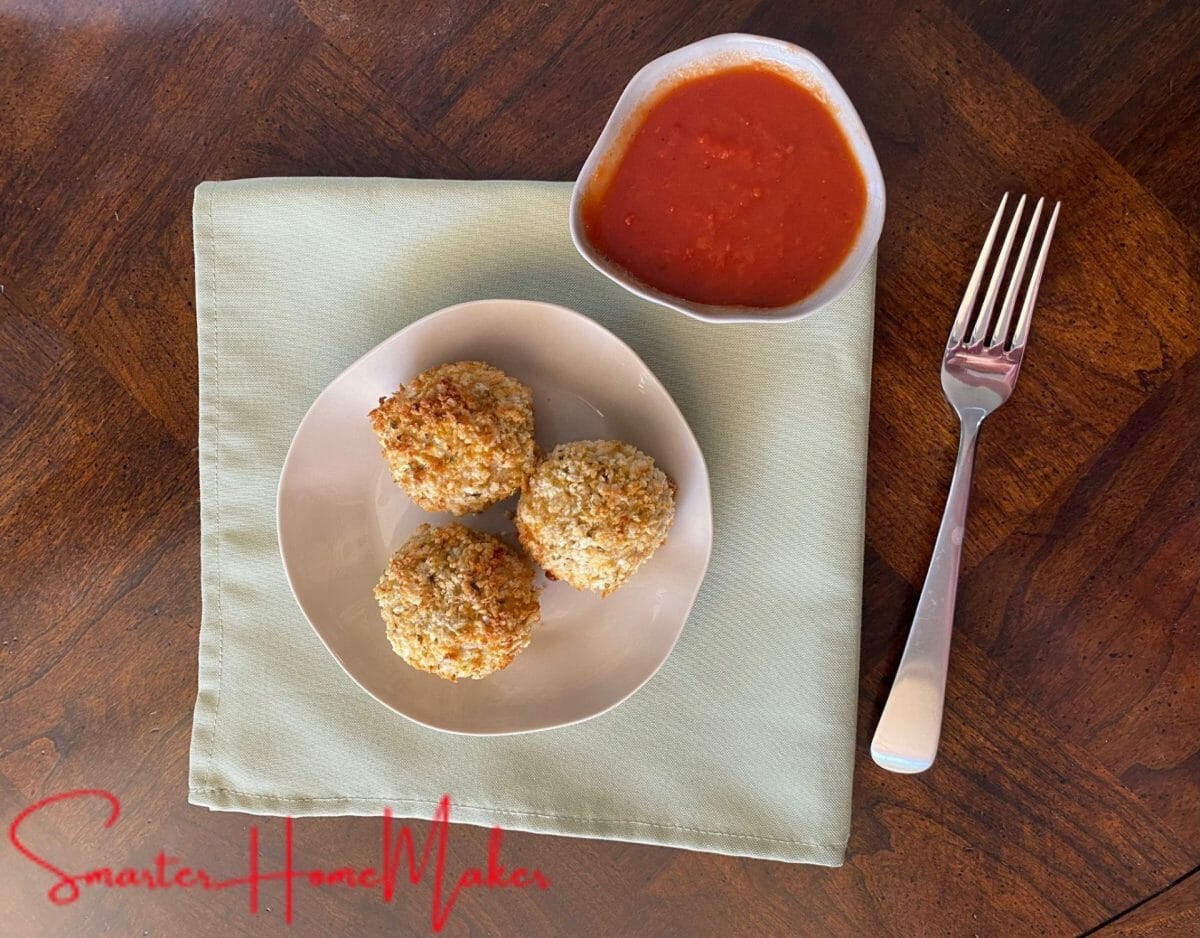
Serve with marinara sauce and eat up!

Variations
| Cheeses | ParmesanSubstitute pecorino romano for parmesan | MozzarellaSubstitute any easily melting cheese (Swiss, Colby Jack, Fontina, etc.) for mozzarella | |
| Fillings | Flavor the RisottoIt stead of adding a chunk of cheese or dollop of ragú, you could simply flavor the risotto with other ingredients. This will cause the ingredients to be even distributed throughout the arancini. | RagúAnother option for filling is ragú, or Italian meat sauce. You could make the ragú with meat or mushrooms. Freeze a dollop of ragú on a sheet tray before rolling into the arancini balls. | CheeseI chose to fill my arancini with cubes of mozzarella cheese. See above for variation options. |
Cook Time
| Model | Cooking time | Temperature |
| Ninja Foodi | Fresh: 11 mins Frozen: 16 mins | 400 F |
| Philips Airfryer XXL (HD9630) | Fresh: 11-13 mins Frozen: 16-18 mins | 400 F |
| Nuwave Bravo XL Grill | Fresh: 11-13 mins Frozen: 16-18 mins | 400 F |
| Power XL 2&3 Qt Vortex | Fresh: 13 mins Frozen: 18 mins | 400 F |
| Cuisinart | Fresh: 11 mins Frozen: 16 mins | 450 F |
| Cosori | Fresh: 11 mins Frozen: 16 mins | 425 F |
| Breville Smart Oven | Fresh: 11 mins Frozen: 16 mins | 450 F |
Diet Variations and Substitutions
Keto
Substitution for Rice
Instead of rice, use 4 cups cauliflower rice. Since cauliflower rice doesn’t have the necessary starch, you’ll need 2 tsp of cornstarch.
At step 5, cook cauliflower until softened, around 3-6 minutes. Add cornstarch to wine to make a slurry. Add wine slurry just as directed in step 6.
NOTE: You will probably only need about 3/4 cup of broth.
Continue recipe as directed.
Substitution for Flour
Use almond flour instead
Substitution for Panko
Use crushed pork rind crumbs instead
Gluten-Free
Substitution for All-Purpose Flour
Use Gluten-Free Flour instead
Substitution for Panko
Use Gluten-Free Breadcrumbs instead
Vegan/Dairy Free
Substitution for Parmesan
Leave out OR use Vegan Parmesan alternative
Substitution for Mozzarella
Use a Vegan Mozzarella or other melting cheese OR choose a different filling option
Additional Notes
Leave out heavy cream
If vegan, use vegetable stock instead of chicken or other meat-based stock
Add Meat
Filling Variation
To add meat to this dish, replace the cheese filling with a meat ragú filling
Add Mushrooms
Filling Variation
To add mushrooms to this dish, replace the cheese filling with a mushroom ragú filling
Flavor Variation
Another way to add mushrooms would be to add mushrooms to the risotto.
Before cooking the onions, sauté finely sliced portobello or white button mushrooms in olive oil until tender. Set aside and cook the risotto as usual. When risotto is finished, stir mushrooms into the risotto (at step 11)
Can You Make This Ahead of Time?
Yes. I would recommend freezing the balls after breading them and then air frying just before serving. You’ll have to cook for 16-18 mins, depending on your air fryer.
They’ll keep for about a week.
Stock Talk: I like chicken bouillon, so I use that to make a stock for this recipe. You could use any stock you like. A homemade broth would be great as well.
Three tips about stock: Be aware of the salt level of your stock or broth. This will determine how much salt you’ll need to add later in the recipe.
If your homemade broth is mild and you didn’t add any salt when making it, you’ll need to add salt for sure. However, in my case, using bouillon added so much salt that it was plenty salty enough to season the risotto.
My second tip is not really a tip, it’s a requirement. Before you do anything, and I mean anything else, put your stock on a back burner and bring it up to a boil. When you add the stock later on in the recipe, it being cold will slow down your cook time and could ruin the texture of the risotto.
The final tip is to have plenty of hot broth ready when you need it. I found I often needed up to twice as much as I initially thought when making the risotto. When cooking, continue tasting as you go to avoid under or overcooking the rice.
You could use anywhere from 3 ½ cups of broth or stock to 8 or 9, depending on your rice, your heat, the pan, the weather, the star alignment… you’re going to have to keep tasting and trusting yourself.
Rice Report: For risotto, you’ll need a short-to-medium grain with a high starch content. Without that starch, you won’t have the thickening agent necessary for this dish.
ALERT: DO NOT RINSE YOUR RICE BEFORE MAKING RISOTTO. YOU NEED THAT STARCH!
You have three real options for types of rice: Carnaroli, Vialone Nano, and Arborio. The first two are more posh grains with a higher starch content. They tend to cook quicker than Arborio.
Carnaroli is what most chefs use for their risotto because it makes the creamiest risotto and is more forgiving than Vialone Nano. However, Arborio is the one you’ll be able to find easiest in the grocery store.
It has less starch than the other two, but is definitely capable of making a risotto. I used Arborio for this recipe.
Tip: Do not use long-grain rice, like basmati or jasmine, for risotto. It does not have a high enough starch content.
Addition Options: The opportunities are nearly endless for flavor options to add to your arancini.
In my recipe, I made a simple risotto and stuffed the arancini with cubes of mozzarella, but you could do a spoonful of ragú, you could mix in pre-cooked bacon or peas, you could flavor your risotto with a puree… anything you can add to risotto, you can add to arancini.
If you want to add something aromatic that needs to be cooked, like pancetta, add that in after your onions are translucent and make sure it’s cooked before moving to the next step. When adding the garlic, you could also add a fresh herb, like thyme.
Tip: If you are using a loose filling, like ragú, freeze your portions in small ice trays or in little dollops on a parchment-lined baking sheet. This will prevent the liquid from destroying the structure of the arancini.
Freezer Friendly: These snacks do just fine in the freezer. You can even air fry them from frozen!
I rolled and breaded my arancini before freezing. I added five minutes to the timer for the few that I had frozen overnight and they were perfect!
Note: Cook times are based on a CHEFMAN air fryer.

Air Fryer Arancini
Arancini is a Sicilian street food, usually made of leftover risotto that has been shaped into balls and fried. With its delicious, crunchy outside and creamy inside, arancini has been a Sicilian staple for centuries. To lighten it up, this recipe uses the air fryer instead of the deep fryer to make this snack easier and a touch less rich.
Ingredients
- Risotto
- 2 tbsp olive oil
- 1 large finely chopped white or yellow onion (just shy of 2 cups)
- 3 cloves garlic, minced
- 1 cup rice (arborio, carnaroli, or vialone nano)
- ½ cup dry white wine
- About 8-10 cups stock or broth (I use chicken, but you could use beef, vegetable, fish, etc.)
- 2 oz or about ⅔ cup of grated parmesan
- Optional: 2 tsp lemon zest
- Optional: about ⅛ cup lemon juice
- Optional: ¼ cup heavy cream
- Salt, to taste
- Pepper, to taste
- Filling
- Mozzarella cheese, cut into ¾” cubes (about 1 cup)
- Breading
- 1 cup all-purpose flour
- 2 eggs
- 1 cup panko breadcrumbs
- Optional: ¾ tsp dried oregano
- Salt, to taste
- Pepper, to taste
- Optional: marinara sauce, to serve
Instructions
- Place stock in a pot and put on the back burner to boil. When boiling, lower the heat to a gentle simmer.
- In a deep, wide stock pot or dutch oven, heat olive oil over low-medium heat.
- When oil is shimmering, add onion and sweat, stirring regularly over low-medium heat until onions are translucent, about 5 minutes.
- Add garlic and cook with the onions until fragrant, about 1 minute.
- Pour in the rice and toast in the oil and onions over low-medium heat. Stir and continue cooking until rice is translucent around the edges with white in the middle. If you know your broth is not salted, add 1 tsp of salt to start. If you’re not sure, wait until the end of the season.
- Once your rice is well-toasted and coated in oil, deglaze your pan by (carefully) adding the wine. It should bubble rapidly. Stir until the alcohol in the wine is cooked off or the pan is nearing dry.
- Using a ladle, carefully add 1 cup of hot stock into the rice, stirring constantly. You don’t need to white-knuckle your spoon, just keep the mix moving at all times. Your mixture should come to a rapid bubble.
- Once that round of stock has been absorbed into the rice, add another 1 cup of hot stock. Keep stirring while you wait for that to absorb.
- Repeat.
- Once you’ve added at least 3 cups of stock, begin tasting your risotto. If it’s still hard, do another absorption of another 1 cup of stock. Taste and repeat as necessary. (It usually took me about 9 cups) Once your rice is tender, your risotto should be fairly thick, similar to oatmeal.
- Remove risotto from heat. Add parmesan and black pepper. Taste and season with salt and more pepper, if necessary. If using, add lemon zest, lemon juice, and/or heavy cream and stir to combine.
- On a parchment or wax paper-lined baking sheet, pour risotto into a smooth, even slab and cool on the counter until no longer steaming. Then, cover with plastic and refrigerate for at least 1 hour and up to 6 hours.
Shape and Bread your Arancini!
- Once your risotto is chilled, use a ¼ cup measuring cup to portion your arancini. When you have your portion, flatten the risotto into a latke-like shape and size. Place a cube of mozzarella in the center. Gently mold the risotto around the mozzarella to create a ball. Roll it between your hands so it is smooth. Do this with all the risotto - creating 10-12 balls.
- Place arancini on a parchment or wax paper lined baking sheet and freeze for about 2 hours, or until very firm. This is necessary so the structure of the arancini stays intact during the air fry!
- In the meantime, create your breading station. Place flour in one bowl, crack eggs into a second bowl, and put panko in a third bowl. Season flour with about 1 tsp of salt and stir. Pepper is optional. Whisk up your eggs in the second bowl. In your third bowl, add oregano to the panko and mix.
- When your arancini are firm, remove from freezer. Working one ball at a time, roll in flour, then roll in egg, then coat in panko mixture. When breaded, return arancini to the baking sheet. When all arancini are breaded, return to the freezer for about 10 minutes.
- Preheat your air fryer for at least 5 minutes at 400 degrees Fahrenheit (about 205 degrees Celsius).
- Remove 3-4 arancini from the freezer at a time, and air fry at 400 degrees F for 11 minutes, or until the edges are beginning to brown and the mozzarella is melted.
- Serve immediately with marinara sauce to dip. Buon appetito!
Nutrition Information:
Yield: 4 Serving Size: 1Amount Per Serving:Calories: 2442Total Fat: 85gSaturated Fat: 27gTrans Fat: 0gUnsaturated Fat: 52gCholesterol: 292mgSodium: 8371mgCarbohydrates: 254gFiber: 4gSugar: 84gProtein: 146g

My name is Keren Tayler. I am a stay-at-home mama to three lovely girls, Sarah + Rachel + Hannah. Prior to becoming a mom, I had a successful career in the accounting field, steps away from becoming a CPA. I decided to give up on my career in order to raise my own kids (as opposed to letting a nanny do it, no judgment here :)) I learned a lot and I love sharing it with other moms. Along the way, I also became a Certified Food Handler.